
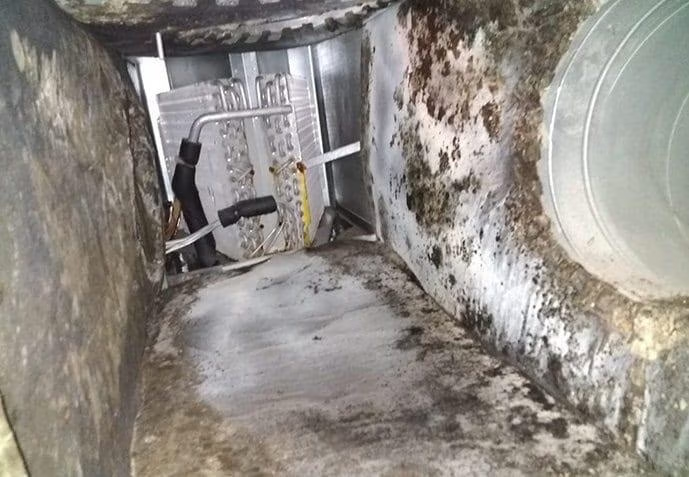
Black Mold in the Air Handler: How to Tell and What Remediation Actually Involves
Your air handler circulates conditioned air throughout your home. At the same time, it operates in a cool, damp environment where condensation regularly develops. When excessive moisture combines with dust, insulation fibers, or other organic debris, mold can grow on the evaporator coil, blower assembly, drain pan, internal insulation, plenum, or nearby surfaces.
When homeowners discover black mold in the air handler, they often worry that the HVAC system may spread contamination throughout the home. Although dark growth deserves attention, homeowners must first identify the moisture source and determine how far the problem extends.
Homeowners often call any dark-colored growth “black mold.” However, color alone cannot identify a mold species. Many types of mold appear black, dark green, gray, or brown. Although Stachybotrys chartarum often receives the “black mold” label, several other molds can produce a similar appearance.
Therefore, instead of focusing only on color, homeowners should ask four important questions:
- Does the material contain mold or another type of contamination?
- What moisture problem allowed it to grow?
- How far has the contamination spread?
- Can a professional restore the affected materials, or must they replace them?
The CDC recommends addressing all indoor mold growth, regardless of its color or species. Most importantly, proper remediation must remove the contamination and correct the moisture source.
What Causes Microbial Growth
An air handler naturally produces condensation as part of the cooling process. Warm, humid air passes across the cold evaporator coil, which pulls heat and moisture from the air. The moisture then enters the drain pan and exits through the condensate line.
Under normal conditions, this process helps control indoor humidity. However, when the system cannot drain, dry, or operate correctly, moisture remains inside the unit. As a result, mold may grow on accumulated dust, internal insulation, or surrounding building materials.
Several conditions can contribute to air-handler mold growth:
- A clogged or partially blocked condensate drain
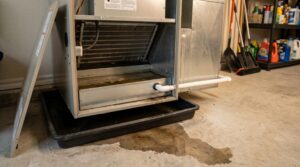
- Standing water inside the drain pan
- A cracked, rusted, or improperly pitched drain pan
- A dirty evaporator coil that holds moisture and debris
- A dirty, damaged, missing, or poorly fitted air filter
- Air leaks around the cabinet, return box, or supply plenum
- Sweating ductwork or air-handler surfaces
- Wet or deteriorated internal insulation
- Excessive indoor or attic humidity
- Improper airflow or blower settings
- An oversized HVAC system that cannot remove enough humidity
- Roof, plumbing, or building-envelope leaks near the unit
Ultimately, mold growth indicates a moisture problem. Therefore, cleaning the visible growth without correcting the underlying cause will usually produce only temporary results.
In many cases, black mold in the air handler develops because condensation, high humidity, or drainage problems keep internal surfaces wet. Correcting those conditions plays a critical role in preventing the growth from returning.
Signs of Growth in Your HVAC
Homeowners may not see contamination immediately because air handlers contain enclosed compartments and hidden surfaces. Nevertheless, several warning signs can indicate a potential problem.
Common signs of black mold in the air handler include musty odors, dark spotting, standing water, wet insulation, and recurring discoloration around supply vents.
A Persistent Musty Odor
First, pay attention to unusual odors. A musty or earthy smell that becomes stronger when the air conditioner turns on may indicate microbial growth somewhere within the HVAC system.
The odor may come from the air handler, drain pan, return box, supply plenum, ductwork, or nearby building materials. Although an odor cannot confirm mold on its own, it gives you a valid reason to schedule an inspection.
Dark Spotting or Discoloration
Next, look for black, dark green, gray, or brown spotting inside accessible areas of the unit. You may notice discoloration on the cabinet, internal insulation, blower housing, coil compartment, drain pan, or surrounding sheet metal.
However, dust, rust, adhesive, soot, and deteriorated insulation can resemble mold. Consequently, a contractor should describe unidentified material as “suspected microbial growth” until proper evaluation confirms its nature.
Discoloration Around Supply Vents
You may also notice dark spots around supply registers or ceiling vents. Condensation, air leakage, dirty insulation, elevated humidity, or contamination within the HVAC system can cause this discoloration.
More importantly, growth around a vent may point to a larger issue inside the connected system. When an inspection reveals suspected microbial growth inside the air handler, the contractor should also inspect the supply and return ductwork. The NADCA ACR Standard calls for duct-system inspection when inspectors find suspected mold contamination on air-handling components.
Water, Sweating, or Excessive Condensation
Additionally, check for standing water, a sweating cabinet, wet insulation, rust, water stains, or repeated drain-line clogs. Each condition can create the moisture that mold needs to grow.
South Florida homes face an especially high risk because many air handlers and duct systems sit in hot, humid attics, garages, or other unconditioned areas. When humid air contacts a cold HVAC surface, condensation can quickly develop.
A Dirty Blower Wheel or Evaporator Coil
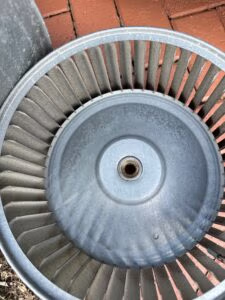
Dust accumulation also creates a food source for mold. Once moisture reaches that buildup, microbial growth can develop and spread across internal surfaces.
Furthermore, a dirty blower wheel or evaporator coil can restrict airflow and reduce heat transfer. As a result, the system may run longer, struggle to control humidity, and use more energy.
Growth That Returns After Cleaning
Finally, take recurring growth or odor seriously. If the problem returns shortly after a routine air-handler cleaning, the original service may not have reached the source.
For example, contamination may remain behind the evaporator coil, inside the blower compartment, beneath damaged insulation, within the plenum, or farther into the duct system. Unless the contractor addresses those areas and corrects the moisture source, the problem may continue.
Can You Identify Black Mold by Looking at It?
No. A photograph or visual inspection cannot reliably identify a mold species.
Laboratory analysis can identify mold when a specific situation requires that information. However, testing does not always provide the first or most important step. When visible growth and moisture already exist, the project still requires cleanup and moisture correction.
The CDC explains that homeowners generally do not need to identify the mold species before removing it. Instead, they should treat all indoor mold growth with appropriate care.
However, an independent licensed mold assessor or indoor environmental professional may need to evaluate larger, unclear, or complicated conditions. An assessor can investigate the source, determine the extent of the problem, collect samples when appropriate, and develop a remediation protocol.
What Does Professional Air-Handler Remediation Actually Involve?
Professional remediation requires much more than spraying a chemical into the unit. A qualified contractor should inspect the complete system, control the work area, physically remove contamination, correct the moisture source, and verify proper system operation.
Proper remediation for black mold in the air handler combines detailed cleaning with moisture correction. This approach addresses both the visible contamination and the condition that allowed it to develop.
The exact process depends on the affected components, the type of materials inside the system, and the extent of the contamination.
1. Inspecting the Entire HVAC System
First, the contractor should inspect all accessible HVAC components, including:
- The return box and return plenum
- The filter rack and filter rails
- The blower wheel, motor, and housing
- The evaporator coil
- The coil cabinet
- The drain pan and condensate line
- The supply plenum
- Internal insulation
- Accessible supply and return ductwork
- Register boots and grilles
- The HVAC closet and nearby building materials
During the inspection, the contractor may record humidity levels, temperature differences, moisture readings, equipment conditions, and visible contamination. Photographs also help document the system before and after remediation.
2. Finding and Correcting the Moisture Source
Next, the contractor must determine why moisture accumulated. Without moisture correction, even the best cleaning will provide only short-term results.
Depending on the cause, the contractor may:
- Clear or repair the condensate drain
- Repair or replace the drain pan
- Seal cabinet, return-box, or plenum leaks
- Repair damaged or sweating ductwork
- Replace deteriorated insulation
- Correct airflow problems
- Adjust blower or system settings
- Recommend humidity-control improvements
- Identify a roof, plumbing, or building-envelope leak
In some cases, the project may require both HVAC repairs and building repairs.
3. Creating Containment
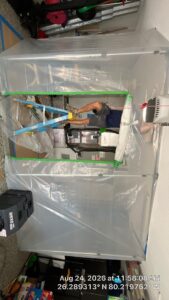
Before technicians disturb contaminated material, they should protect the surrounding home. Depending on the project’s size and location, they may install floor protection, plastic barriers, zipper doors, and HEPA-filtered negative-air equipment.
Containment controls dust, spores, insulation fibers, and debris during the cleaning process. Additionally, negative air helps keep disturbed particles from traveling into occupied areas.
4. Shutting Down and Accessing the Equipment
Technicians must safely shut down and de-energize the HVAC system before opening or cleaning internal components.
They may remove access panels or create controlled service openings to reach hidden areas. After all, technicians cannot properly clean contamination that remains behind a coil, inside a closed blower compartment, or underneath damaged insulation.
5. Removing Materials That Cannot Support Restoration
Some materials cannot withstand effective cleaning. For example, wet, deteriorated, delaminating, or heavily contaminated internal insulation may require removal and replacement.
The contractor should evaluate the material’s condition, porosity, accessibility, and contamination level. If technicians cannot thoroughly clean and dry the material, replacement often provides the most reliable solution.
Furthermore, a contractor should never use paint or coating to hide heavy contamination or avoid removing damaged material.
6. Mechanically Cleaning the Components
After establishing containment and access, technicians physically remove dust, debris, and suspected microbial growth.
Depending on the component, they may use:
- HEPA vacuuming
- Controlled brushing and agitation
- Damp wiping with microfiber cloths
- Blower-wheel and housing cleaning
- Drain-pan cleaning
- Filter-rack and cabinet cleaning
- Evaporator-coil cleaning with an appropriate non-acidic cleaner
- Accessible plenum and return-box cleaning
Mechanical cleaning forms the foundation of proper remediation. Therefore, fogging or spraying a product cannot replace physical source removal.
7. Applying Antimicrobial Products When Appropriate
After technicians physically clean the surfaces, they may apply an EPA-registered antimicrobial product when the material and application allow it.
The contractor must follow the product label, including its directions for dilution, contact time, ventilation, and approved surfaces. Although antimicrobial treatment can support the cleaning process, it cannot remove dirt, damaged insulation, or accumulated debris.
8. Encapsulating Suitable Surfaces
In some cases, technicians may encapsulate clean, dry, and structurally sound surfaces with a coating designed for that specific application.
For example, a contractor may encapsulate certain fiberglass, duct-board, wood, or approved HVAC surfaces. Encapsulation can secure residual fibers and create a cleanable finished surface.
However, technicians must clean and dry the surface first. They should never use encapsulation to cover heavy contamination, conceal water damage, or trap moisture.
9. Cleaning or Replacing Affected Ductwork
If contamination extends beyond the air handler, the project may also require duct cleaning or replacement.
Technicians can often clean suitable ductwork under negative pressure with HEPA-filtered vacuum equipment, compressed air, whips, brushes, or other approved agitation tools. This process loosens and removes debris instead of pushing it farther into the system.
However, flexible ductwork, duct board, and internally lined ducts require careful inspection. When these materials show heavy contamination, water damage, deterioration, or loss of integrity, the contractor may recommend replacement instead of cleaning.
10. Reassembling and Recommissioning the System
Finally, technicians should reassemble the air handler, seal all service openings, install a clean filter, and return the system to operation.
They should also check:
- Drainage
- Airflow
- Temperature performance
- Cabinet and plenum seals
- General HVAC operation
Additionally, the contractor should provide photographs and written documentation that identify the components the team cleaned, treated, repaired, encapsulated, or replaced.
What Air-Handler Remediation Does Not Include
Proper remediation does not rely on shortcuts. Specifically, it does not mean:
- Spraying bleach into the HVAC system
- Fogging chemicals without physically cleaning surfaces
- Painting over visible growth
- Cleaning only the access panel
- Installing a UV light while leaving contamination in place
- Replacing the filter while ignoring the coil, blower, and drain pan
- Cleaning the air handler without inspecting affected ducts
- Treating contamination without correcting the moisture source
UV lights and other indoor-air-quality products may support a properly designed maintenance plan. However, they cannot remove existing dust, mold, debris, or damaged materials.
Should You Clean a Moldy Air Handler Yourself?
Air-handler cleaning can expose you to electrical components, sharp sheet metal, refrigerant lines, delicate coil fins, and contaminated materials. Additionally, improper cleaning can spread particles throughout the home or damage expensive HVAC equipment.
The CDC recommends respiratory, eye, hand, and skin protection during mold cleanup. People with asthma, chronic lung conditions, mold allergies, or weakened immune systems should avoid participating in the cleanup.
For these reasons, homeowners should leave suspected HVAC contamination to qualified professionals who understand both mold remediation and HVAC systems.
How Can You Prevent Mold From Returning?
After remediation, focus on keeping the air handler clean, dry, sealed, and operating correctly.
Preventing black mold in the air handler requires consistent filter changes, routine drain maintenance, humidity control, and prompt repairs when the system begins to leak or sweat.
Start with the following steps:
- Replace air filters regularly.
- Keep the condensate drain and drain pan clean.
- Schedule periodic coil and blower inspections.
- Repair cabinet, plenum, and return-box air leaks.
- Maintain proper airflow throughout the home.
- Repair sweating ducts and damaged insulation.
- Monitor indoor humidity.
- Address roof, plumbing, and building-envelope leaks quickly.
- Never continue operating a system with wet or heavily contaminated materials.
South Florida’s humidity makes ongoing moisture control especially important. Even after a thorough cleaning, humid attic or garage air can enter through leaks and create new condensation problems.
When Should You Schedule a Professional Inspection?
Schedule an inspection when you notice visible dark growth, musty odors, standing water, repeated drain backups, wet insulation, heavy coil or blower buildup, sweating ductwork, or recurring discoloration around supply vents.
A thorough inspection should determine whether the problem affects one serviceable component or involves the air handler, duct system, HVAC closet, and surrounding building materials.
Greenfox Air Quality provides detailed HVAC and indoor-air-quality inspections throughout South Florida. Our team examines the air handler, evaporator coil, blower assembly, drainage system, plenums, accessible ductwork, and surrounding moisture conditions before recommending a scope of work.
When the system requires remediation, we focus on containment, physical source removal, detailed cleaning, appropriate treatment, moisture correction, and clear documentation.
Do you suspect black mold in the air handler? Contact Green Fox Air Quality to schedule an inspection and find out what your HVAC system actually needs.
Air Quality Done The Greenfox Way.
